> For the complete documentation index, see [llms.txt](https://support.goodaccess.com/llms.txt). Markdown versions of documentation pages are available by appending `.md` to page URLs; this page is available as [Markdown](https://support.goodaccess.com/configuration-guides/features/sso-scim/auth0.md).
# Auth0
This guide will show you how to integrate GoodAccess with Auth0 SSO.
{% hint style="info" %}
This feature is available in the **Premium plan and higher**.
{% endhint %}
{% hint style="danger" %}
**Remember to grant your users access permissions to GoodAccess. Users without them won't be able to log in.**
{% endhint %}
## Step 1 - Adding a new identity provider
[Log in to the GoodAccess **Control Panel**, and go to **Settings** > **SSO & Identity**.](https://app.goodaccess.com/sso-and-identity/)
Click **+ Add provider**, enter the **Provider name**, choose your **Identity Provider**, and click **Continue**.
## Step 2 - Setting up Single Sign-On with SAML
Log in to the [Auth0 Admin console](https://manage.auth0.com/), go to **Applications** > **Applications**, and click **+ Create Application**.
Give the application a name, select **Native**, and click **Create**.
Go to **Addons**, and open **SAML2**.
Creating a new application
Creating a new application
Opening the SAML2 addon
### 1. Settings
Go to **Settings**, and copy the details from GoodAccess - **(2) GoodAccess links**.
* **Application Callback URL** - Assertion Consumer Service URL
Copy the below code into **Settings**:
```
{
"mappings": {
"email": "email",
"name": "name"
},
"createUpnClaim": false,
"passthroughClaimsWithNoMapping": false,
"mapUnknownClaimsAsIs": false,
"mapIdentities": true
}
```
Return to GoodAccess, and click **Continue**.
Return to Auth0, scroll down to the bottom of the page, and click **Enable**.
Setting up the Settings
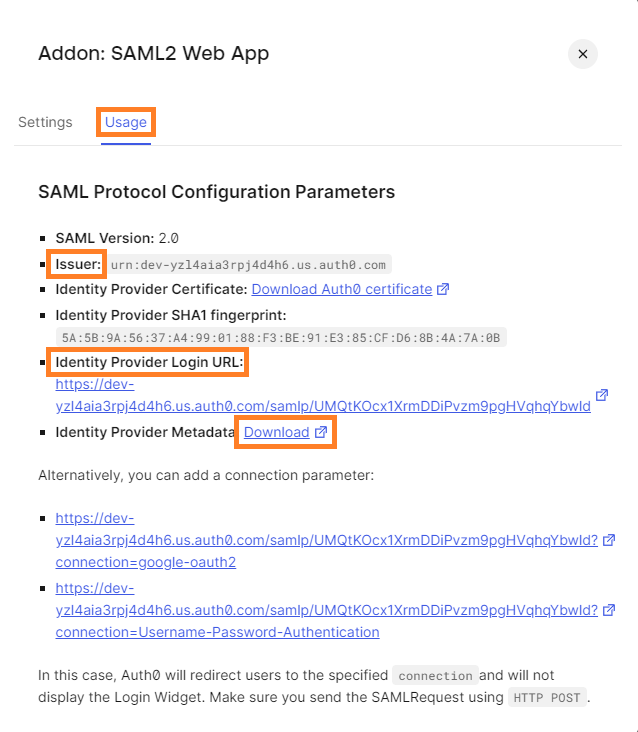
### 2. Usage
Go to **Usage**, download the **Identity Provider Metadata**, and open the file in a text editor (e.g. Notepad).
Copy the details to GoodAccess - **(3) Identity Provider links**, and click **Continue**.
* **Sign in URL** - Identity Provider Login URL
* **Entity ID** - Issuer
* **X509 signing certificate** - Copy the certificate from the text editor
Click **Submit** to finish the configuration.
Setting up the Usage
Copying the certificate from the Notepad
You have now successfully set up your Auth0 SSO with GoodAccess.